|
1.
Put a record in your turntable.
2.
Before you place the
Clamping Knob on the turn table, slacken
the small grub screw in the side of the Setting Ring with
the Allen Key supplied.
3.
Then screw the Setting Ring
down towards the base of the Clamping Knob.
4.
Place the Clamping Knob
on your turntable, and screw the knurled Knob (this is the one
with the white plastic insert in its base) into the top of the
brass bearing by three or four full turns.
5.
Then, hold the base of
the Clamping Knob gently and screw the Setting Ring up to
the knurled Knob until it touches the white insert of the
knurled Knob.
6.
Next, unscrew the knurled
knob 1/2 a turn.
7.
Again, turn the Setting Ring
up so that it touches the knurled Knob again.
8.
Now tighten the small grub screw
in the Setting Ring (just 'nip' the grub screw up, it
should not be too tight).
9.
Finally, the knurled Knob
can now be tightened down onto the Setting Ring so that the white
plastic insert is pressing onto the Setting Ring, and as
it does this it will clamp the vinyl disc to the platter (again, do not
over tighten, it only needs to be nipped up).
Your Clamping Knob should now be set correctly, and the next time
you use it, the Setting Ring should not need to be adjusted. All
you should have to do is screw the knurled Knob down and it will
clamp the vinyl to the platter. |
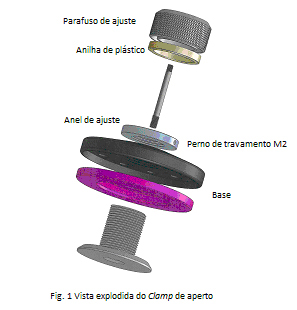
1.
Coloque um disco no prato do giradiscos.
2.
Antes de instalar o clamp de aperto alivie o
pequeno perno de travamento M2 do anel de ajuste com a
chave Allen fornecida.
3.
Rosque o anel de ajuste até à base do clamp
de aperto.
4.
Coloque o clamp de aperto no prato do giradiscos e
rosque o parafuso de ajuste através do manípulo recartilhado
(esta é a única peça com uma anilha de plástico branco na base)
três ou quatro voltas completas.
5.
Imobilize com cuidado a base do clamp de aperto
e desenrosque o anel de ajuste até tocar na anilha de plástico
do parafuso de ajuste.
6.
Desenrosque o parafuso de ajuste cerca de 1/2 volta.
7.
Volte a roscar o anel de ajuste de modo a tocar no
parafuso de ajuste.
8.
Aperte agora o pequeno perno de travamento M2 do
anel de ajuste (apenas encoste para não danificar o veio - não
apertar muito).
9.
Finalmente, o parafuso de ajuste pode agora ser apertado
até ao anel de ajuste de modo que a anilha de plástico o
pressione, o que, deste modo, permitirá pressionar o disco de vinil
contra o prato (mais uma vez, não aperte demasiado - só necessita ser
encostado).
O clamp de aperto pode agora funcionar corretamente e, na
próxima vez que utilizá-lo, não haverá necessidade de afinar a posição
do anel de ajuste. Tudo o que você deve fazer é apertar o
parafuso de ajuste, o que garantirá o encosto do disco de vinil ao
prato. |